
Before you get started, make sure that all the items you’ll be using on your recurve bow are instaled – things like stabilizers, bow sight, string, quiver, and so on. You want your bow to be as complete as possible because whenever you introduce a new component you will likely need to make some tuning adjustments. This is a critical step that in my experience is often overlooked by archers, particularly those who are only experienced with a crossbow (which typically require very minimal tuning, if any).
Our first step is making sure that all the parts of your bow are properly installed. Let’s start with the nocking point.
Perfect Nocking Point Location
Make sure to purchase a nocking point with your bow as they usually don’t come with the package, unless you are buying an entire recurve bow set with arrows and everything included. When installing the point, make sure it is positioned approximately half an inch above “square.”
Square refers to the imaginary line that extends from the surface of your arrow rest and forms a 90 degree angle with the bow string when in its lose position. You can use a T-square device to measure that precisely, though it can be done with just the arrow if you take your time and do things accurately. See image below:
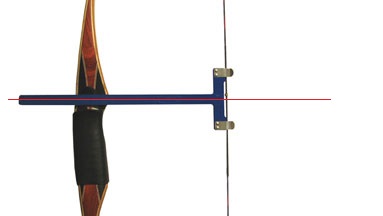
See that red vertical line that I drew? You want to place your nocking point 0.5″ above it. You may need to adjust this ever so slightly, but we’ll get to that later in the tuning process.
At this point it’s worth mentioning that the nock on your arrow should have a proper fit for the nock point on your string. As a rule of thumb, you want the fit to be tight enough so that the arrow can hang freely from the string, with the nock/nock point being perfectly capable of supporting the arrow’s weight. At the same time, the arrow should be able to disengage if the string is given a strong tap (with your hand) a few inches away from the nock.
Don’t let this distract you; many people spend months upon months researching the perfect arrows before they actually buy their recurve. Yes, the type of arrows you use is really important. But it is also certain that no amount of research you do will actually help you choose the “perfect” arrows for your bow; only practice and time will help you determine that, as you will never know what the ideal arrows are before you get to intimately understand the behavior of your particular bow. So my advice is to simply get one or two different types of quality arrows, try them out with your recurve bow, see how accurate they are, and then try to improve from there once you gain some practical experience. Any other approach is just a waste of your time.
Micro-Tune The Brace Height
By brace height we simply mean the distance between the deepest part of the bow riser, and the string in its loose position.

The vast majority of recurve bows have a brace height somewhere between 7.5 and 9.75 inches. The brace height of your bow will dictate some of its behaviors, such as how loud it shoots and how much pivoting your arrow will experience mid-air. On most recurves you’ll be able to adjust the brace height by up to 1/2″ in both directions (either increase it or decrease it). How do you do that?
By twisting the string as you string your bow. The more twists you add at the tip of the string, the more more “flexed” it becomes, hence pulling the limb tips slightly away from the riser and increasing brace height. Similarly, if you want to decrease the brace height, you will reduce the number of twists on the string. The instruction manual that came with your recurve bow will include the manufacturer’s recommendation as to an acceptable brace height range.
Your goal is to twist and untwist the bow string until you reach a brace height that results in the least noise and vibration when an arrow is shot. It’s a good idea to ask someone to stand next to you and tell you when the bow is being the most quiet, as it can be difficult for the archer shooting the bow to judge this properly due to very close proximity to the string.
Step by step:
Simply string your bow, measure the brace height using a ruler, shoot 10 or so arrows, then adjust the brace height by 1/8 of an inch up or down by adding or removing a few twists. Make sure to measure the exact brace height after every change made, note it down, and assign each setting a subjective “noise” rating based on how loud it tends to be when shooting the arrows. At this point don’t worry too much about your shooting accuracy.
Once you’ve found the ideal brace height (which will differ depending on your bow, string materials, and type of arrows you’re shooting), it’s best to write the exact height in inches onto the inside of the limbs of your bow, using a permanent marker. This is a very important value and you want to always have it available “on hand.”
Note: ideal brace height varies from bow model to another, and can even vary slightly across two different bows of the same make and model. You should therefore never rely on another person’s suggestion regarding the brace height to use, and always follow the procedure above to determine the appropriate height for your setup.
What Next?
Please proceed to Part #2 of our recurve bow tuning guide to continue.
Found your article very informative. Never heard of moving the arrow rest off center of the bow string. Made good sense when thought about.
Had two long bows when young. Neither had cut outs. Arrow rest was naturally off center of the bow string. Feel sorry for the inventor of the cut out to perfectly center the arrow with the bow string.
Also have two finally tuned compound bows. In reference to porpoising and up and down of an arrow in flight. Don’t remember where I learned this but it worked.
Called a paper target. Same as I would use a paper target to pattern a shot gun. Placed a few feet in-front of a bow target. Shoot a bare shaft arrow from five to ten through the paper target. Small round hole – do nothing. Elongated hole to the right, left, up, down – follow your instructions.
I mention this because shooting a bare arrow at straw can leave a wrong impression. Arrow will follow the least point of resistance and might give a wrong conclusion.
Thank you again for an interesting article. Will send on to a few beginners…. bobbymac
i had a question about brace height. I have the PSE razorback, RH, 30lb, which is 62″ long. I bought it from a pro shop but was never given any papers or anything from the manufacturer so I’m trying to determine brace height for it. Guy at the shop said 7.5 to 8.5, but I’m seeing anywhere from 7-8 on the Internet. PSE doesn’t seem to have any info on their site. Any idea what a narrower range might be (7-8.5 is a large range)(one guy at the shop set it to 7″, but when I took it back another guy set it to 7.5″. I’m not sure either is better than the other). I know I’ll need to play around with it anyway but this is my first bow and I didn’t even know what brace height was before this article. Great site, by the way! It’s so useful!
Also, I know I’ll have to adjust the nocking point once I change the brace height. It looks like the line you drew on the picture above is well above the shelf… Should it be .5″ above the shelf or .5″ above the line you drew? I shoot off of a stick on rest so I assume I would adjust .5″ above the rest, instead of the shelf, if that’s what it is.
The objective is to simply set a nock point on the string that moves the knock of the arrow up .5″ from where it would be if the arrow were perpendicular to the string.
Great site! I have a question about calculations to get the in-hand draw weight based on different draw lengths, which I understand is set according to a 28″ draw length. I have a 25lb bow but only draw 25″, which means I am actually pulling less than 25lbs – do you know how to calculate how much I have to increase the brace height so I am actually pulling 25lbs at 25″ of draw length?
Thanks!
Hi there I have just purchased a Ragim Black bear bow and a 54 inch string but the brace height is well above the recommended parameters of 7.5 to 8.25 inches. I have tried taking twists out of the string but I am getting no where. can you help please.
Regards Tony
I’ve had to put 70 twists into my bowstring to get the correct bracing height. Is that right ???
I’ve benefitted greatly from this guide! My question (that just received 78 views and no replies at the big forum) is this: My endless loop string with a little archer’s beeswax tends to keep more and more twists remaining in it even after being unstrung. Sure it relaxes a number of twists, but with an increasing number of twists remaining in it. Unless I untwist it completely and start over with visibly straight parallel strings repeatedly, how do I keep track of how many twists it has? Should I wax it until it doesn’t untwist at all?
Puzzled in Florida
Jeff